Showing posts with label Recipe. Show all posts

Monday, May 13, 2013

Yay, irrigation season has begun, Pickled asparagus, Chicks outside full time


South Central Idaho is basically a desert. High desert, but still desert. Looking at Google Maps you see little green circles all over the place. All those green circles are from the irrigation pivot sprinklers. We grow a lot of alfalfa, corn, beans, and yes potatoes. Idaho is one of the top dairy producers in the US. Those cows eat a lot of alfalfa, and corn to make all that milk. There is a huge system of canals and deep water wells to make all those fields green. The big farmers use pivots sprinklers. Those are huge sprinklers on an arm that rotate around in a circle.

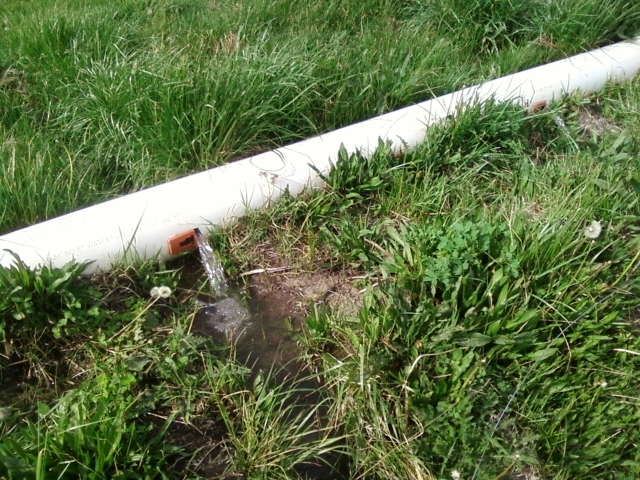
We don't have enough acreage to have to worry about that. What we do have is gated pipe. The water comes down the canal and fills a head gate. It's a big culvert pipe that sticks out of the ground. The head gate needs to be taller than any point down the pipe that it waters. It uses gravity to build up pressure to move the water down the pipe and out the gate. Water starts on Dave's acreage out back, then on to Andrea's, us, and then over to Rebecca. 


Those orange plastic thingies are the gates. We get our water every nine days in the evening. I go out and make sure the valve to Rebecca's is closed so all my water doesn't run out over her property. Then I make sure I don't hear any of my gates with water pouring out of them. It takes a little bit for the pressure in the pipes to build. With my big silly boots on I go through and open about every third or fourth gate about half way. The front pasture to the west gets watered overnight first. In the morning I have to tromp back out and close those gates while opening the ones to the short pasture to the north. By the time I get home from work it's all good and flooded and I close those gates and open the ones that run to the ditches under the trees and let that run over night. In the morning again I go out and close those and open the gates to the east pasture and it runs all day. In the evening I go open the valve at the end of the pipe and let all that water run to the neighbors, and walk my pipe and make sure all my gates are closed. Here's the result. A couple acres of green lush grass for the ponies and the calves.

This whole flood irrigating business will run through the first week or two in October usually. Every nine days. 


Asparagus season is here too. It grows wild on the ditch banks and at the edges of the fields around here. I never had it before I moved here. It looked weird and I wasn't about to taste it growing up. Scotty made me try a piece. Holy crap was it good. Even raw, right out of the ground I like it. I drive slowly up and down the back roads looking for either the orange mass of dead fronds from the year before, or the new bright green fronds that seem to shoot up 12 inches over night. It doesn't last long so I pick as much as I can find. This year I tried pickling it.
The neighbor down the road gave us a few jars last year that she had made, and oh man it's so good. I couldn't get a hold of her so I went exploring on the internet. Cause that's where I find every thing dontcha know? I ended up trying the recipe from this site.  

Spicy Pickled Asparagus
     4 pounds asparagus, trimmed to fit your jars
     3 cups vinegar (half apple cider vinegar, half white vinegar)
     3 cups water
     2 tablespoons pickling salt
     4 tablespoons pickling spice
     1 tablespoon red hot chili flakes
     4 garlic cloves, peeled
     4 slices of lemon (I didn't have any lemons so I used a few splashes of lemon juice)
   
Instructions

  1. Sterilize your jars in boiling water for 5 minuets
  2. Put the lemon slices in the bottom and pack the trimmed asparagus into the jars. Tuck a garlic clove                down into the spears. 
  3. Bring the vinegar, water, and spices to a boil. Pour into jars on top of asparagus leaving at least 1/2 inch of head space.
  4. Put lids and rings on the jars and process in hot water bath for 20 minuets for quarts. (You can skip this last part if you plan on just putting your pickled asparagus in the fridge).
  5. Wait at least 24 hours before eating, to give the asparagus spears a chance to get sufficiently pickly.


The chicks are officially outside chicks now. They have enough feathers, and it's warm enough that they don't need a heat lamp. The big hens have been kicked out of the run and they're pretty damned miffed about it. I didn't want them picking on the chicks, and the broody keeps stealing their eggs. They keep laying in the other boxes, (Duh) but the broody hen keeps stealing the eggs before I can get in there. This is bad because A) I'm hungry at breakfast time, and B) she'll only set for a day or two after the chicks hatch, if they do.

The old hens keep looking it at the interlopers to their run like, "Hey, why are they always eating and I can't get some too?"

So I opened the door to the run and let the little buggers out and the old biddies in. The older hens were not impressed with the grower crumbles the chicks were eating and with a few pecks to the little ones to show their displeasure everyone hunted bugs. 


I still have one pullet the is smaller than the rest, and very much smaller then the creepy meats. 

I totally understand why Carolyn's daughter won't go in the pen with the freaky little feathered mutants. They're hopping up on my feet, pecking at my legs and trying to trip me to make the food get in the bowls faster when I go in there now. I do this weird shuffle slide with my feet so none of them can get under foot and get squashed. I look like the pied piper of ugly, half feathered, huge legged little chickens when I walk out in the yard when they're out. They're all jumping along behind me begging for food. 

Saturday, March 23, 2013

Rainbows, Home Made Hot Pockets, Para Cord Bracelet, New Chihuahuas


We had a little rain and wind the other day. I snapped this pic off the side porch of the house. Pretty huh? 


I've tried once before to make hot pockets when the kids were still living here. They were...OK. I used pie crust, mozzarella, pizza sauce, and pepperonis. It didn't seem to make near as much food as the work I put into it. I couldn't get the edges to seal well. The pie crust puffed up too much. I just wasn't very happy with the results even if the kids did gobble them down faster than I could pull them out of the oven.

Somewhere while surfing the web I ran across the idea of using pizza crust. I don't remember where I saw it. I wasn't even sure I remembered it right. I went on ahead and bought 4 packages of WallyWorld's pizza crust mix though. I love cheese steak pizzas. I'm also very cheap. I didn't want to spring for a single package of thin sliced steakums when I was already buying hamburger in bulk. So I've been making these pizzas with ground hamburger.

Cheese steak hot pockets
2 packages of ready to mix pizza dough
1/2 pounds ground hamburger
1 jar alfredo sauce
1/2 green pepper diced
grated mozzarella (honestly I forgot how much of this I started with when I started grating, and I ate some while I was working)
   optional- sauteed onions and mushrooms. These are really yummy, but wreak havoc on my tummy, so I skipped them this time.
This made enough for 6 pockets, and enough dough left over for a small personal pizza.

  • Brown hamburger and peppers. Salt and pepper to taste. While the hamburger is cooking, preheat the oven and start the pizza dough in two batches. It will have to set for 5 mins and rest. 
  • Roll out one batch of the pizza dough in a big rectangle.
  • I made notched in the dough to divide it into 6 hot pockets  
  • Add 1 tbs spoon of alfredo sauce in each square and spread, leaving room around the edge to seal the pocket.
  • Pile the hamburger, peppers, and cheese on the alfredo sauce

  • Roll out the other batch of dough to cover
  • Cut into six pockets
  • Seal each edge of each pocket by pressing gently with your fingers, then gently with a fork
I think I baked these on 385 for about 20 mins or until golden brown. I watched my oven because I knew the pizza was going to be done before the pockets.


I've been fiddling a little bit with Para Cord Bracelets. I made one for Scott a bit ago, and one for Mike. I don't know what the kind of know was, and I'm too lazy right now to go look it up. I just scrolled through some videos on YouTube until I found something I liked. Scott asked me if it was possible to make one for him a little flatter and a little wider. So again, off to YouTube I went. This is what I came up with this time. Sorry, crappy phone cam doesn't catch the color right, but I liked it. So did Scott.


I haven't taken any good pics of them. I'm such a slacker Mommy. I took two chihuahuas home from work. They were a customer's of mines. He just didn't want to deal with two needy little dogs anymore. Too much work for him. Their names are Molly and Wiley. Molly is the red female, and Wiley is the tan male. Scotty calls them the Sorrel and the Palomino. They are 2 years old this past Feb. Both spayed and neutered. Molly is neurotic, but we're working on. Wiley is a snuggle bunny. 


Monday, December 17, 2012

Garlic Ginger Chicken

I occasionally get lost on Pintrest. For hours. Really. Pintrest is like a mind sucking black hole that you don't even realize you've fallen into until you look up and realize hours have gone by, and you're looking at things three subjects removed from what you went on to look for in the first place. I did find a recipe I wanted to try the other day. Today I remembered finally to get some ginger while I was at the grocery store. 

Garlic Ginger Chicken


4 chicken breasts. (I cut these up when I buy them. I slice them horizontally to make them thin, and then in half to make them about palm size, and freeze. I just used two cut up into 8 pieces)
4 cloves of garlic chopped fine
1 tablespoon grated ginger
4 tablespoons brown sugar
1 tablespoon oil
2 splashes soy sauce

Preheat oven to 500 (yes you read that right. I was kinda shocked at first too)
Lightly grease baking dish
Heat garlic in oil on med low heat till it just barely starts to brown
Add ginger and heat through
Add soy sauce and brown sugar
Remove from heat and stir until sugar mixes well
Salt and pepper chicken and place in baking dish
Spread garlic ginger mix evenly over chicken
Bake uncovered for 15-20 mins


I made rice with this. The pan juices were really good over the rice. I didn't season the chicken enough before adding the garlic ginger mix. Next time though I'll remember that chicken can take a lot of salt before tasting it. 

Tuesday, October 2, 2012

My new fav bread recipe


This is my new go to recipe for bread. I love this stuff. I've made it twice now. It was easy to make. It wasn't the sticky mess that took forever to knead as the last recipe I've been using. It made a little less bread, but the time involved that I saved more than made up for it.

Now, my mixing skills weren't as strong as his. I had to stop with the spoon and start mixing by hand a lot earlier. Most of my kneading was done in the bowl.

The first time I made it, I didn't have to sprinkle any flour on the board to knead it. The second time, I just had to flour my hands.

I love the single rise, in the loaf pan. The first time, I let it rise in an oven that had been set to warm only for just a few mins and turned off. I forgot the bread was in there and it rose over the tops of the pan and started hanging off the sides. I punched it down and let it rise again before baking. I didn't get a good dome over the top of the pan after being baked, but it was still tasty. It was still rather dense. The second time came out perfect. Almost too soft and bubbly inside.

I let mine bake for 35 mins and could have let it go another 7 or 8 mins. It was very soft inside. Spreading softened butter was enough to tear it if I wasn't careful. I used less sugar in mine, and a little more salt. I did do the half wheat/half white flour the first time.

Home Made Bread
  • 5 to 5-1/4 cups flour
  • 1/4 cup sugar (I used a little less)
  • 1/2 tablespoon salt (I used 3/4)
  • 2 tablespoons yeast
  • 1-1/2 tablespoons oil
  • 2 cups warm water


  • Add the yeast to the warm water and stir to mix
  • In a large bowl add your flour, sugar, salt, and oil
  • Now add in the yeast and water. I didn't let it sit and get frothy, didn't add sugar to the water. Just let it set as long as it took to combine the other ingredients
  • Stir with a long wooden or plastic spoon until it starts to come together. It will be crumby underneath. I have to get in here with my hands sooner than the video and start squishing
  • Squish, knead, press the dough until it's all incorporated and all the flour and bits stuck to the sides have come together
  • Turn out onto the counter or a bread board and knead for 5 mins
  • Preheat your oven to 350 degrees. 
  • Divide your dough in half and place into two, lightly greased, loaf pans and let let rise to double in volume
  • Bake at 350 for 35 mins
  • Remove from loaf pans to a wire rack to cool. 

Wednesday, September 19, 2012

Tasty has an appt at Scarrow Meats. Jalapeno Poppers. Squash bake.

Scott called yesterday and set up for Tasty to go to Scarrow Meats Tuesday next weeks. She doesn't seem to be getting any bigger, and is still just munching us out of house and home. Wilbur will stay another week or two. At least until Andrea decides to take him to her place, or start buying feed for him. Now I just have to find a freezer to put her in when she comes home.

The garden is winding down. We got a little bit of frost the other day. All the tops of the plants wilted and turned black. All of a sudden I can see everything that's hiding under there. Most of what you see is weeds. I was so good pulling weeds the beginning of the season. Not so much lately.

All the corn is done. The 20 or so ears that were still out there got ate by a skunk. I saw corn stalks being pushed down here and there. I thought it was the dog chasing after a feral cat. I've seen her tear ass off into the trees chasing it before. I heard something thrashing in the corn the other night, Ashley was still on the porch with me so I knew it wasn't her. Grabbed the big flashlight thinking I was going to scare off a cat, or maybe the coyote we saw earlier that night. OH NO! SKUNK!! Ash came with me, and I shoed her back to the porch and hightailed it myself. No way I was gonna go in there after a skunk. I thought about going in the house for the 22 and taking care of it, but it was after 11 at night, and all I needed was crazy Mrs. Shirk behind me calling the sheriff out. Besides, I'm still all high on painkillers from the surgery last Mon. Ne reason on this planet for me to be handling a gun. But I did see the skunk lean against a corn stalk till it broke over. The next morning I went out to salvage what was left, and he'd gotten them all.

Earlier this week I went out and picked all the jalapeno peppers that finally grew. Those plants got frosted the beginning of the season and I almost gave up on them. I think I missed one pepper and it's out there the prettiest red color. I made poppers out of the ones I brought in.

Jalapeno Pepper Poppers
  • Half a sleeve of crackers, crushed. I used Club, it was in my cabinet
  • One pkg cream cheese, softened
  • half cup shredded cheese. I used Colby Jack because it's what I had in the fridge
  • 2 tsp paprika
  • 1/4 cup Parmesan cheese 
  • 1 tsp garlic powder
  • Enough peppers to use all the filling.
I can't tell you how many peppers to use, because mine were all different sizes out of the garden. More if they were all small, less of they were as big as the ones I got from the store for the salsa? I sliced them in half and it filled a whole baking sheet. Not a lot of help, I know. Anywho...
  • Preheat oven to 375
  • Mix the softened cream cheese with all the cheeses, paprika, and garlic powder. 
  • I cut the top off the pepper and sliced in half. It was too much bother to core out the center. WEAR GLOVES. 
  • Fill the peppers with the cheese mixture and place on a baking sheet, cheese side up. Sprinkle with the crushed crackers. 
  • Bake in the oven for 15-20 mins until the cheese starts to melt and the crackers darken slightly. 
I didn't eat any of these. I don't like spicy foods, and I don't like the taste of jalapeno even if they weren't hot. I was told by everyone who had them, that I can make them over and over again, anytime They want them. lol. I know they weren't the traditional breaded and fried, but they were a big hit.  No pics. They all got eaten before I had a chance to grab the camera, but here's a shot of the empty pan :)


I made a different version of the Southern Baked Squash. My friend Lacy came over and she can't have gluten, but I wanted to do squash bake again. So we went with cheese. 

Cheesy Squash Bake

  • 3 yellow squash and three zucchini, cubed. Mine here getting pretty large in the garden. You might want to use 4 or 5 smaller. 
  • Half a pkg cream cheese
  • 1/4 cup butter
  • 1/2 cup Parmesan cheese
  • 3 eggs
  • Half a sleeve of crushed crackers. I used Club, they were in my cabinet
  • 1 cup shredded cheese. I used the Colby Jack I had in the fridge


  • Boil the cubed squash 15 mins or until tender. 
  • Preheat oven to 375
  • Spray inside of a 9x13 baking pan with cooking spray
  • drain squash, and mash until it had the constancy of mashed potatoes
  • Add eggs, butter and cheeses and blend well. 
  • Smooth mixture into the backing dish and cover with crackers. I left one third of uncovered for my friend
  • Bake in the oven uncovered about 45-50 mins, or until the crackers start to darken, and the squash mixture is bubbly. 


Cute baby cows in the pasture next door to us

We picked the first of the five watermelon that grew this year. We had Charleston Greys. Big watermelon. Scott had to carry it in for me since it's over the limit of what the doc says I can carry. It's a very tasty watermelon. I think we could have left it out there one more week. The white rind was very thick. Most of the seeds were dark brown, but not black yet. Still very sweet though. I'm still waiting on the cantlelope to be ready to eat. 

Thursday, September 13, 2012

Southern Baked Yellow Squash and Zucchini

In an effort to use up the amazing amounts of squash and zucchini I have growing in the garden, I cam across this recipe at allrecipes.com/. I forgot to take a pic of the finished results, but mine looked similar to the image at all recipes. I did change their recipe and added the zucchini and Italian breadcrumbs instead of plain. I thought it tasted good. Scott said he'd eat it again.


Ingredients

  • 1-1/2 pounds yellow summer squash and green zucchini, cut into 1-inch cubes
  • 1/2 cup dry Italian bread crumbs
  • 1/2 cup chopped onion
  • 2 eggs
  • 1/4 cup butter, melted
  • 1 tablespoon white sugar
  • 1 teaspoon salt
  • 1/2 teaspoon black pepper
  • 1/4 cup butter, melted
  • 1/4 cup dry Italian bread crumbs

Directions

  1. Preheat an oven to 375 degrees F (190 degrees C). Grease a 2-quart baking dish.
  2. Place the squash and zucchini in a large saucepan, cover with water, and boil until soft, about 15 minutes. Drain the squash well, place in a large mixing bowl, and mash until slightly chunky. Stir in 1/2 cup of bread crumbs, onion, eggs, 1/4 cup of butter, sugar, salt, and pepper until thoroughly combined, and spread mixture into the prepared baking dish. Drizzle the top of the casserole with 1/4 cup melted butter, and sprinkle 1/4 cup bread crumbs over the butter.
  3. Bake in the preheated oven until the casserole is cooked through and the top is golden brown, about 1 hour.

LinkWinin

Try these other posts